Gday guys and girls, and thanks for been here!
In this tutorial I’m gonna show you how to radically change the front look of the blog page of WordPress. I suggest you to start with the default theme from a WordPress fresh installation, because this code could not works with some heavy customized themes. In this case I’m gonna use the default Twenty Eleven WordPress Theme, so, let’s get started!
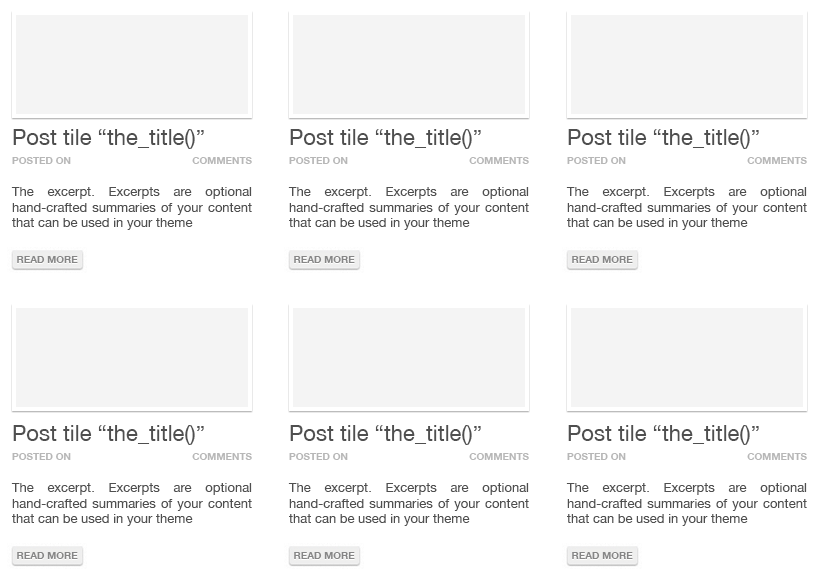
Let’s take a look at the final result I want to achive
![wordpress-scheme]()
Our code starts with the classic control provided by WordPress, to check if there are posts published or not
<?php if(have_posts()): ?> <?php endif; ?>
Using this code guarantee a safety check and avoid the print of weird errors into our blog page. Now we have to call our posts with this simple PHP loop.
<?php while ( have_posts() ) : the_post(); ?> <?php endwhile; ?>
Now we can easily use the default WordPress codes to retrive our posts infos:
- the_post_thumbnail()
- the_title()
- twentyeleven_posted_on()
- the_excerpt()
- comments_popup_link()
Remember to call all of these elements into the <?php ?> tags.
Now we have to create the basic HTML structure around the php code, and for a smart and light alignment, I like to use the <ul> <li> elements. This HTML tags allow me to manage the size and the alignment of every post, all together or one by one.
Wrap your PHP code into the HTML tags, as shown.
Paste this into your index.php file
<?php $i=1; if ( have_posts() ) : ?>
  <?php set_post_thumbnail_size(275,999); ?>
  <ul id="article-home">
    <?php while ( have_posts() ) : the_post(); $i++; ?>

    <li <?php if ( ($i % 3)==0 ) : echo 'class="centrale"'; endif; ?>>
       <article id="post-<?php the_ID(); ?>" <?php post_class( $feature_class ); ?>>
       <div class="entry-summary">
          <span id="feature"><a href="<?=get_permalink($post->ID)?>">
          <?php if (has_post_thumbnail()) {the_post_thumbnail();}?></a></span>
          <header class="entry-header">
             <h1 class="entry-title"><a href="<?php the_permalink(); ?>"
title="<?php printf( esc_attr__( 'Permalink to %s', 'twentyeleven' ),
the_title_attribute( 'echo=0' ) ); ?>" rel="bookmark">
             <?php the_title(); ?></a></h1>

             <div class="entry-meta">
                <?php twentyeleven_posted_on(); ?>
                <?php if ( comments_open() && ! post_password_required() ) : ?>
                   <span class="commento">
                      <?php comments_popup_link( '<span class="leave-reply">'
 . __( 'Reply', 'twentyeleven' ) . '</span>', _x( '1',
'comments number', 'twentyeleven' ), _x( '%', 'comments number',
'twentyeleven' ) ); ?>
                   </span>
                 <?php endif; ?>
              </div><!-- .entry-meta -->

           </header><!-- .entry-header -->
           <?php the_excerpt(); ?>
           <?php echo'<a href="'. get_permalink($post->ID) .
'" id="more">' . 'LEGGI TUTTO' . '</a>'; ?>
        </div><!-- .entry-content -->

        <footer class="entry-meta">
           <?php edit_post_link( __( 'Edit', 'twentyeleven' ),
'<span class="edit-link">', '</span>' ); ?>
        </footer><!-- .entry-meta -->
      </article><!-- #post-<?php the_ID(); ?> -->
    </li>
  <?php endwhile; ?>
</ul>
<?php endif; ?>
Now we have our blog page full of posts printed with full size featured images and default text styles. To let the magic happens, we have to use some CSS tricks!
Past this into your style.css file
#article-home {
	margin:0;
	padding:0;
	list-style: none outside none;
	width: 950px;
}
#article-home li {
	float: left;
	height: 420px;
	padding: 0;
	width: 285px;
}
#article-home li.centrale {
	padding: 0 47px;
}
#feature img {
	border: 5px solid #DBDBDB;
	box-shadow: 0 1px 2px #666666;
}
#more {
	background: none repeat scroll 0 0 #EEEEEE;
	border-radius: 0.3em 0.3em 0.3em 0.3em;
	box-shadow: 0 1px 1px #999999;
	color: #666;
	font-size: 10px;
	margin-top: -1em;
	padding: 5px 6px;
	text-shadow: 0 1px 0 #FFFFFF;
}
#more a {
	color: #666;
	font-size: 10px;
}
#more a:hover, #more a:active, #more a:focus {
	color: #FFF;
	text-decoration:none!important;
	text-shadow: rgba(0, 0, 0, 0.3) 0 -1px 0;
	box-shadow: 0 1px 1px #666;
}
#more:hover, #more:active, #more:focus {
	background: none repeat scroll 0 0 #1982D1;
	color: #FFF;
	text-decoration:none!important;
	text-shadow: rgba(0, 0, 0, 0.3) 0 -1px 0;
	box-shadow: 0 1px 1px #666;
}
As you can see the CSS code is really small and easy to understand. Now you have a full blog page large 950 pixels with 3 columns, perfectly aligned .
As I always suggest, feel free to edit the code and try to find your own way or style to do this things, and of course, if you have some troubles or need help, write me a comment.
Thank you everybody, see ya!